The Electric Guitar
How to tune the guitar
How to use a plectrum
Beginner guitar chords
Barre chords
Power chords
First guitar scale
Major scale lead patterns
Pentatonic guitar scale
Home


Lead guitar scales
The first lead guitar lesson.
Most people learning to play lead guitar are first shown the pentatonic scale, that’s a 5 note scale.
The reason they’re shown this scale is because it’s easier to play and remember.
I’m not going to show you the pentatonic scale here, instead I’m going to show you the Major scale.
The pentatonic scale has its uses, but the major scale contains all the notes of the pentatonic scale plus 2 extra notes, so why not go the whole hog?
We can always catch up with the pentatonic scale later.
The easiest way to understand the major scale is to start with the C major scale. The C major scale is all the white notes on the piano or keyboard.
Okay, we’re not taking piano lessons here, so not to worry.
The first thing to understand before you work out any guitar scales is what an octave is.
The octave.
An octave up is a musical note that is twice the frequency of another note. They are both given the same name, but the second one is higher in pitch. It stands to reason then, that an octave down is half the frequency of the preceding note and so lower in pitch.
Simple enough, so how does that relate to the music scales on a guitar?
Music scales on the fretboard.
A music scale is simply a method of dividing the octave up into steps, or partitions.
The western music scale is made up of 12 equal steps, called semitones.
On the guitar these are frets. I fret = 1 semitone.
2 frets = 1 whole-tone, also called simply “a tone”.
If you played every note on the fretboard, that would be the chromatic scale, and it wouldn’t sound very musical.
The most commonly used music scale is the major scale.
The C major scale on the guitar.
Below you can see the notes of the C major scale in the first position on the fretboard.
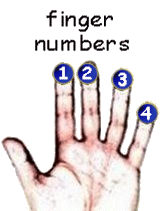
The numbers 0, 1, 2 and 3 show which fingers on the left hand are used to play the notes, as shown on the finger number picture
Obviosly, the 0 in the first picture means you play the open string.
These pictures show the guitar fretboard from your point of view while holding the guitar, so looking down at the guitar, or more accurately if you put it flat on your lap, that’s what you’ll see.


How to play these guitar scales.
We start with the 6th string open note, and progress upwards in pitch from there.
When you do this, it’s important to try and pick using both up-strokes and down-strokes, so we start with a down stroke on the thick open E, then an up stroke on the F, a down stroke on the G and so on.
The first picture shows you what fingers to put where, and the second picture shows you the note names.
The idea here is to play the scale all the way from the open E on the 6th string up to the G on the third fret of the 1st string, and then go back the way you came.
This gets your fingers moving both forwards and backwards, and is a good exercise to get started on.
It also helps practice coordination between your left and right hand.Here’s a video I just posted up on youtube. don’t worry about the bit at the end.
I have a highly enjoyable bad habit of playing guitar when I should’ve stopped already
But Wait! That’s just the beginning
I know, it really looks like not enough information to play lead guitar with, and you’re right.
This little scale pattern only covers the first three frets of the guitar. If you look carefully though, you can see how to work out the rest of the fretboard.
Here’s how to do it.
The first thing to do is find all the octaves, or more precisely, find the pattern that tells you where all the octaves are.
If you look at the second picture that’s called “C Major scale note names”, you’ll notice that, for instance, from the open E on the sixth string to the E on the fourth string, is two strings down and two frets along.
This pattern is true of the F and G etc. In fact, all the notes on the 6th string and 5th string have a corresponding note an octave higher, which is two strings down and two frets along – “along” being closer to the guitar’s body.
The situation with the 4th and 3rd strings is that the corresponding octaves are two strings down and three frets along.
Here’s your Lead guitar lesson homework.
Sorry, I didn’t mean to scare you with the homework thing, but if you do this you’ll embed it more firmly in your mind, and playing lead guitar will just flow more naturally.
Find all the notes that are either the same or an octave, whether they’re an octave up or down, and start working out the next pattern up from the one I’ve already given you.
When you’ve got the next pattern, take that one and work out the next one.
Here’s something to keep in mind when working out these lead guitar patterns.
It’s called the “One fret per finger” rule, and although I never stick to any rules precisely, and you shouldn’t either, it gives a good indication of how wide a lead scale pattern should be.
When I first worked this out, I came up with five distinct lead patterns, each one fitting nicely into the other.
If you’ve got all the guitar chords, including bar chords, well under your belt, you’ll start to see which chords fit in where.
What about the other major scales?
The Major scale pattern remains the same, so If you wanted to play in D major, you’d just play everything two frets along from the C scale, and if you wanted to play in B, then you’d play everything one fret back – “Back” meaning closer to the nut.
The distances between the notes of the C major scale are relevant to the different keys as well.
There’s no key of B# because B# is C, and the same goes for E and F
B to C, and E to F are only a semitone apart.
The rest are all a whole tone apart.
Later on I’ll post a video showing how to work out everything, but my computer seems to take forever processing these things, and I run out of time to do my work.
When you’re done with figuring it all out on your own, you can double check it on the Full C Major scale fretboard page.
PS – Don’t forget the Free Guitar Lessons 14 day trial – Here. It’s good for any level of guitar playing.
